Seperti Facebook yang sukses membuat halaman Page khusus selain halaman profile, Google+ (G+) beberapa waktu lalu juga kembali merilis halaman page yang khusus dibuat untuk tujuan halaman penggemar seperti website, merek, bisnis dll. Dan tidak diragunakan lagi halaman ini sangat berguna untuk membuat saluran trafik dengan cara mempromosikan blog atau website. Jika anda sudah pernah membuat halaman page untuk facebook saya rasa anda tidak akan bertanya lagi dengan page pada G+ karena cara kerjanya sangat mirip dan hampir sama :)

Ada kelebihan yang di miliki Page pada G+ jika dibandingkan Facebook, dimana Page pada G+ dalam waktu dekat akan terintegrasi dengan hasil pencarian pada Google Search Engine, kita cukup memberi tanda (+) saja sebelum melakukan pencarian, misalkan kita mengetikan +pepsi atau +angry bird maka secara otomatis Google akan memberikan hasil result tertentu yang terkait dengan Page pada G+. Bayangkan jika itu adalah halaman anda yang tampil pertama, tentu BOOM trafik tidak akan diragukan lagi. Tapi ada tapinya, halaman yang muncul mungkin adalah halaman yang populer dengan jumlah penggemar terbanyak :) jadi berusahalah untuk membuat halaman G+ anda Populer, asalkan jangan buka halaman Salon ++ aja ya wkwkwkkwk.

Tutorial Cara Membuat Halaman di Google+

Prosesnya gak ribet dan sangat sederhana yang penting anda sudah terdaftar disana.

1. Langsung tuju ke halaman ini https://plus.google.com/pages/create
2. Pilih halaman yang ingin anda buat, Saya sendiri memilih tab (Lainnya) atau anda bisa memilih halaman tertentu misalkan blog atau website jadi terserah saja.
3. Silahkan masukan judul halaman dengan alamat blog yang ingin dipromosikan. Jangan lupa beri tanda centang bahwa anda setuju dan tekan tombol (Buat)
google plus page 4. Masukan slogan halaman minimal 10 kata dan tambahkan photo biar manis.
page google plus 5. Selesai, tinggal di promosikan saja linknya :)
Microsoft Outlook merupakan salah satu email client desktop. Dengan Microsoft Outlook email yang Anda terima akan lebih terorganisir. Sebenarnya masih banyak macam email client dekstop yang lain. Kami mencontohkan untuk email Hotmail atau Live.

Sekarang buka Microsoft Outlook Anda. Isi data akun email Anda. Lihat gambar di bawah ini:


Untuk email dari Hotmail, biasanya Anda diminta untuk mendownload OutlookConnector.exe. Download file tersebut dan install.


Klik Finish pada gambar di atas dan klik Cancel pada window "Add New Account". Buka Microsoft Outlook kembali, setelah klik Yes, Anda isi kembali akun email Hotmail Anda. Berhasil.


Klik Finish dan tunggu Microsoft Outlook Anda sampai selesai melakukan sinkronisasi (Send/Receive) dengan akun Hotmail Anda.
Sekarang tinggal Anda coba tambahkan akun email yang lain.
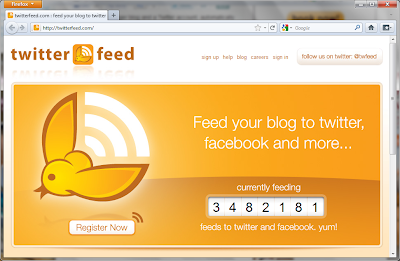
Jika Anda mempunya postingan blog menarik dan ingin menyebar luaskan secara otomatis melalui Twitter, Anda bisa memanaatkan Twitterfeed. Twitterfeed memungkinkan Anda untuk meneruskan postingan blog ke akun Twitter yang Anda inginkan.

Caranya, kunjungi http://twitterfeed.com dan lakukan pendaftaran, Sign up.

Bagaimana Cara Membuat Postingan Blog Otomatis Masuk ke Twitter

Bagaimana Cara Membuat Postingan Blog Otomatis Masuk ke Twitter

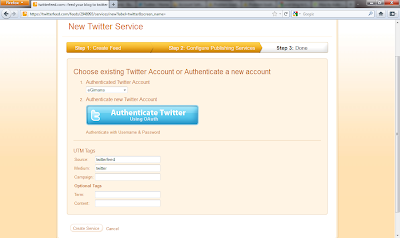
Klik Authenticate new Twitter Account, setelah itu pilihan akun Twitter akan muncul sebagai Authenticated Twitter Account lalu klik Create service.

Bagaimana Cara Membuat Postingan Blog Otomatis Masuk ke Twitter

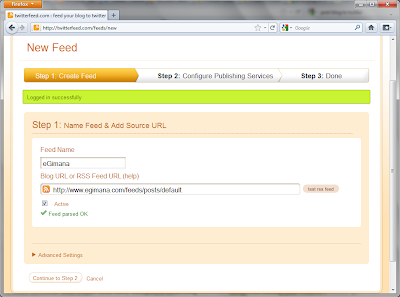
Tambahkan Feed blog Anda lalu lanjut ke langkah selanjutnya.

Bagaimana Cara Membuat Postingan Blog Otomatis Masuk ke Twitter

Pilih Twitter.

Bagaimana Cara Membuat Postingan Blog Otomatis Masuk ke Twitter

Klik All done.

Bagaimana Cara Membuat Postingan Blog Otomatis Masuk ke Twitter

Selesai.

Bagaimana Cara Membuat Postingan Blog Otomatis Masuk ke Twitter
Seperti pada email di akun lain seperti Gmail, Yahoo! Mail juga menyediakan fitur filter email. Email yang masuk bisa Anda filter berdasarkan subject/judul email, isi yang terkandung dalam badan email, alamat email pengirim, dan sebagainya. Tentunya dengan filter email tersebut, akan memudahkan Anda dalam menggunakan email.

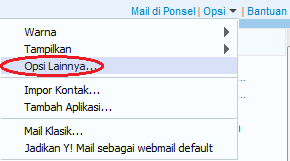
Cara membuat filter email di Yahoo! Mail (Yahoo! Mail Bahasa Indonesia) yaitu: Loginlah ke akun Yahoo! Mail Anda, dan klik menu "Opsi" pada bagian kanan atas halaman, lalu klik "Opsi Lainnya...".

Bagaimana Cara Memfilter Email di Yahoo

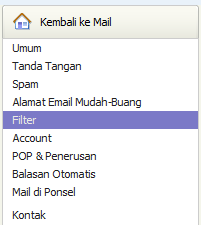
Kemudian klik menu "Filter".

Bagaimana Cara Memfilter Email di Yahoo

Klik "Tambah Filter".

Bagaimana Cara Memfilter Email di Yahoo

Dalam postingan ini kami contohkan memfilter email dari Facebook, isikan kata "Facebook" sebagai nama filter dan judul dari email yang akan di filter. Pada pilihan Pindah ke Folder, pilih "[Folder Baru]".

Bagaimana Cara Memfilter Email di Yahoo

Kemudian klik "Simpan Perubahan".

Bagaimana Cara Memfilter Email di Yahoo

Dan Anda akan diminta untuk memasukkan nama folder yang akan dibuat untuk menyimpan hasil filter.
Selesai.
Untuk melakukan aktivasi Windows 7 secara online, sebelumnya Anda harus memasukkan License Key yang sesuai dengan versi Windows 7 yang telah Anda install tersebut. Anda mempunyai waktu 30 hari setelah menginstall untuk melakukan aktivasi Windows. Memasukkan license key atau product key biasanya dilakukan waktu melakukan penginstalan Windows 7 atau juga setelah Windows 7 terinstall.

Jika ketika Anda melakukan instalasi Windows 7 sudah memasukkan license key maka langsung lakukan aktivasi, buka Properties dari System Windows Anda. Start > Computer > Klik kanan > Properties.


Lalu klik Activate Windows Online Now untuk melakukan aktivasi.


Jika belum memasukkan license key atau ingin mengganti license key Anda bisa memasukkan license key atau product key dengan klik Change product key.


Lalu klik Next dan Windows akan melakukan aktivasi secara online.


Jika telah berhasil akan seperti ini.


Semoga membantu... :)

The Google Panda search update affected millions of websites within the U.S.A. when it was first rolled out. There wasn’t any discrimination between a large conglomerate company versus a small Mom & Pop shop website. Both were equally hit by the changes. Panda is all about relevancy and non-duplicated quality information.
The Panda / Farmer update was a major change to what Google deems “relevant” content. The Farmer portion of the update was specifically addressing websites that collected content from other websites; with or without permission. Either way these sites created one of the things that Google has stated it dislikes: Duplicate Content. Search Engine Land has an excellent article explaining the Farmer update and ramifications.
You have to understand that Google and the other search engines are in a constant struggle to provide the best search results to their users, find the best websites to meet the search terms and spammers who are constantly trying to cheat their way to the top of the results. Google releases hundreds of algorithm tweaks a year. And every so often they release a major search algorithm overhaul that really captures peoples attention.
Matt Cutts on Panda May 25th Live


How To Fight Google Panda with SEO Optimization?

Optimization Your Title
It is an absolute must for title optimization that your exact keyword phrase appears in your title tag. After all, your title is a brief outline on what your document is in reference to. So if you don’t mention your keyword phrase there, then is your page really related to that particular topic?
Make sure your title does not repeat your keyword phrase too many times. This is called keyword spamming and is very bad. Try to limit your keyword phrase so that it only appears 1 to 2 times.
Optimization Length Title
An optimal title length forces you to properly describe your webpage without stuffing it with too much content.
As a basic guideline, your title should be between 10 and 70 characters long.
Optimization Length URL
Short, descriptive urls are optimal. It is very important the url for your webpage contains your keyword phrase and is no longer than 100 characters.
Special Characters
Special characters such as “@ ^ * ; < > ~ =” should not be used in your title if you can help it. Generally, no one would include these characters in their search query. The less you dilute your content with unnecessary information, the more optimized your title will be.
Text Size Distribution
A good-looking webpage has a nice balance of large text and small text. Check out any good blog or article and you will see a general format of a heading (large text) followed by a paragraph (small text). This process will be repeated throughout the page having each heading outline the topic of the paragraph, which contains more detailed information. This format gives a reader an easy way to skim through your document and find what they are looking for.
Search engines also like this format to figure out the important topics of your web page. Since your page can only contain so many words, you need to make sure you do not overuse your large text. If you have 30 headings and only one paragraph, then how can you determine the overall theme of the document? Likewise if you had 1 heading and 30 separate paragraphs, then what is the sub-topic of each paragraph?
The human eye likes organization and direction just as search engines do. Create a page that is easy to read by an actual person and any search engine will be able to pick out your theme and keywords easily as well.
Exact Matches within Small Text
On the surface, small text doesn’t seem very important. However, this is not the case. Small text is a big part of the puzzle when it comes to determining a webpage’s true relevancy to a particular keyword phrase.
Your large text may be used to capture the readers’ attention, but your small text is used to convey the full message of your topic.
Match Proximity
Keyword Proximity refers to how close one keyword is to another keyword. For example, if my keyword were “go”, then I would have a proximity of 1 word for the phrase “go dog go”.
It is very important that your body optimization does not allow your keywords to be too close nor allow them to be too far away from one another. If they are too close, you could be in danger of over optimization, which you will be penalized for. But if they are too far away from one another, then your page may deemed as not being highly associated with your keyword.
Exact Match Prominence
The first group of text that a visitor reads on your site should contain your keyword phrase. After all, if your document truly represents your keyword phrase, then why wouldn’t it be part of your first sentence? It will not only grab the users attention to indicate the topic of your page, but search engines will love it too.
Try to make your keyword phrase appear within the first 10 words of your body text. This will do wonders for your body optimization.
Word Count
Your page should contain 200 to 1500 words. This will give a search engine a solid amount of content to index. Google for example, begins to place less importance on any body text that appears lower than 4095 characters on a page.
Make sure each paragraph relates to the general theme of the page as well as the keywords you are optimizing for. Also, make sure your body text is unique and fresh! Simply adding content taken from another website will flag your page for duplicate content and it will be excluded.
Image Validation
This one should be obvious. If you have broken images that fail to display on your page, then you might want to remove them or fix them. Some browsers will automatically hide broken images, but luckily our seo tool will identify these problems for you.
Outgoing Link Usage
Google may penalize you if you display more than 100 outbound links on your page. It is important to avoid looking like a link farm.
Meta Tag Description
Your metatag description should briefly describe your page in 200 characters or less. It is very important that each page of your website has a unique metatag description.
Although metatags are not as important as they once were, the metatag description is still used for display purposes. For instance, Google will use the metatag description in the description for each search listing. You should describe your webpage in a concise and detailed manner to entice a searcher to click on your link.
Page Redirect
Your webpage should return an HTTP status code of 200. 301 Redirects will cause problems when a search engine crawler attempts to crawl that particular webpage.
Page Size
If your visitors can navigate through your site quickly, they will be more attentive towards your content. High load times will only frustrate visitors and will cause them to click the back button to visit another search engine result.
The total size of a web page’s text content should not exceed 100 KB. Optimally it would be best if the page text were closer to 40 KB in size. If you run into this problem and cannot condense the page, consider splitting the page up into several pages that target different keyword phrases. The more concise and targeted each page is for a single keyword phrase, the better your rankings will be.
Page Freshness
The more often your webpage content changes, the more frequently both visitors and search engines will return to view these changes. A stale site is a boring site! Try to go over your pages as often as you can to improve them. Even if it is a small change, at least it shows that your web pages are actively paid attention to. As a general guideline, try to update each of your pages at least every 6 months.
Stylesheet Validation
Sometimes it’s hard to spot a reference to a broken CSS file. Just like any other link on your website, it is important all your CSS files return a 200 http status code.
Javascript Validation
Sometimes it’s hard to spot a reference to a broken Javascript file. Just like any other link on your website, it is important that all of your javascript files return a 200 http status code.
Non-www Redirect
People that visit your website page and decide to link to that particular page will often link to www.yoursite.com/page.html or yoursite.com/page.html.
Search engines can mistakenly view these 2 urls as different web pages when in actuality they are not.
Instead of having 20 backlinks to www.yoursite.com/page.html, a search engine will determine you have 8 backlinks to yoursite.com/page.html and 12 backlinks to www.yoursite.com/page.html. This will dilute the trust signal these backlinks produce.
It is very important that you configure your web server to 301 redirect any requests to yoursite.com/*.html to www.yoursite.com/*.html.
Here is an example of how to do this with an Apache .htaccess file:
RewriteCond %{HTTP_HOST} .
RewriteCond %{HTTP_HOST} !^www\.yoursite\.com [NC]
RewriteRule (.*) http://www.yoursite.com/$1 [R=301,L]
Here is an example of how to do this within a Lighttpd config file:
$HTTP["host"] =~ “^([^.]+\.[^.]+)$” {
url.redirect = (
“^/(.*)” => “http://www.%1/$1″
)
}
i hope you like this post and can help you :)

Koq kayaknya sok inggris bin british yak... ™ÐŒÃ®iîk.·:::D Ќîiîk :D::·. Ќîiîk™ .....
Google baru-baru ini merilis Google Picasa untuk Mac OS yang dimana sebelumnya Aplikasi desktop penayang gambar ini hanya tersedia untuk versi Linux dan Windows. Pengguna Mac OS sekarang akhirnya bisa juga menikmati Google Picasa dengan menginstallnya secara langsung melalui alamat picassa.google.com/mac. Untuk keterangan lebih lanjut silahkan sambangi saja langsung blog resminya google disini.


Gambar diambil dari http://www.appleinsider.com
Google Image Search baru-baru ini telah menambahkan dua fungsi terbaru berupa pilihan: Clip Art and Line Drawings.  Dengan fitur pilihan Search-by-style ini tentu akan lebih mudah menentukan pilihan gambar untuk hasil maksimal dalam proses pencarian. Hasil pencarian menggunakan pilihan Clipart biasanya ditampilkan dengan gambar warna-warni yang nyata, ini berbeda jika kita menggunakan pilihan Line Drawings yang hasilnya ditampilkan dalam gambar kartun hitam dan putih. Sebagai contoh kita bisa bereksperimen dengan keyword ("linux" untuk pilihan Clipart dan "linux"dengan pilihan line drawing) silahkan disimak perbedaan hasilnya.


Selain dua pilihan diatas anda juga bisa menggabungkan pilihan ini dengan operator lainnya. Silahkan tuju ke menu drop-down untuk batasan pencarian lainya berupa Face (wajah), News content dan photo content.

Info selengkapnya bisa anda baca disini
Saya yakin pembaca setia blog ini tidak kesulitan untuk memasang tombol Google+ (G+), tapi tidak semua juga mengerti caranya, terlebih yang baru belajar ngeblog. Selain itu disini saya juga  mencoba menjelaskan secara rinci dari beberapa masalah yang kadang membuat tombol Google+ tidak bekerja sebagaimana mestinya. Jadi silahkan luangkan waktu sejenak untuk belajar tutorialnya dibawah ini:

Langkah memasang tombol G+ sangat mudah silahkan ikuti tutorial dibawah ini

Silahkan memasang Script dibawah ini atas Tag </body>
<!-- Tempatkan tag ini di bagian head atau tepat sebelum tag body penutup -->
<script type="text/javascript" src="https://apis.google.com/js/plusone.js"></script>


Kemudian anda bisa memasang tombol G+ dimana saja dengan menambahkan kode dibawah ini.

<!-- Tempatkan tag ini di tempat yang Anda inginkan untuk menampilkan tombol +1 -->
<g:plusone size="small"></g:plusone>


Cara memasang tombol G+ diatas sebenarnya sudah selesai, tapi jika anda ingin menambahkan kode yang lebih rinci anda bisa mencoba beberapa script dibawah ini:

Tombol G+ dengan ukuran Standar (24 piksel)
<g:plusone></g:plusone>

Tombol G+ dengan ukuran Kecil (15 piksel)
<g:plusone size="small"></g:plusone>

Tombol G+ dengan ukuran Sedang (20 piksel)
<g:plusone size="medium"></g:plusone>

Tombol G+ dengan ukuran Tinggi (60 piksel)
<g:plusone size="tall"></g:plusone>

Tombol G+ Untuk HTML5
<div class="g-plusone" data-size="standard" data-count="true"></div>

Anda juga dapat membuat custom tombol G+ sendiri
<script type="text/javascript" src="https://apis.google.com/js/plusone.js">
  {"parsetags": "explicit"}
</script>
<script type="text/javascript">
  function renderPlusone() {
    gapi.plusone.render("plusone-div");
  }
</script>
<body>
  <a href="#" onClick="renderPlusone();">Render the +1 button</a>
  <div id="plusone-div"></div>
</body>
 
Custom Tombol G+ dengan URL khusus
<!-- customized for a specific address -->
<g:plusone href="https://plus.google.com/108442421331149025926"></g:plusone>
Untuk customize tombol G+ saya menyarankan anda memasukan url dari Google+ profile atau halaman (page) G+ yang sudah ada buat, lihat tutorialnya disini

Cara pasang Tombol G+ disebelah Tombol Facebook (dalam halaman posting)
<span style='float:left; width:65px;'><!-- Place this tag where you want the +1 button to render -->
<g:plusone expr:href='data:post.url' size='medium'/>
</span>
<iframe allowTransparency='true' expr:src='&quot;http://www.facebook.com/plugins/like.pjumpjhp?href=&quot; + data:post.url + &quot;&amp;layout=button_count&amp;show_faces=false&amp;width=100&amp;action=like&amp;font=arial&amp;colorscheme=light&quot;' frameborder='0' scrolling='no' style='border:none; overflow:hidden; width:110px; height:30px;'/>
</div>


Kode standar Google+ tidak bekerja pada postingan dalam lingkup halaman home (index).
Pada halaman Posting dengan menggunakan kode <G:Plusone/> biasanya tidak terjadi masalah, tapi saat kalian mencoba memasang tombol G+ yang ditujukan pada halaman post yang letaknya berada dalam halaman utama ini biasanya bermasalah karena G+ setahu saya tetap akan mendeteksi sebagai halaman index bukan sebagai halaman post. Untuk mengatasi masalah ini silahkan mencoba menggunakan kode ini <g:plusone expr:href='data:post.url'/>